Airbrushing Miniatures: Unleash Your Creativity with Precision and Style
Airbrushing miniatures has become an increasingly popular technique in the world of miniature painting. Whether you are a seasoned painter or a hobbyist looking to elevate your skills, airbrushing offers a unique and efficient way to achieve stunning results. In this article, we will explore the art of airbrushing miniatures, discuss the necessary tools and supplies, and delve into the techniques that make this method so effective. So, grab your airbrush, and let's dive in!

The Power of the Airbrush
Imagine being able to effortlessly apply smooth, even layers of paint on your miniatures, achieving gradients and textures that were once only possible with painstaking brushwork. That's the power of the airbrush. This versatile tool uses compressed air to atomize paint particles, resulting in a controlled and consistent spray pattern. With an airbrush, you can achieve a level of precision and efficiency that is simply unmatched by traditional brush techniques.
Choosing the Right Tools and Supplies
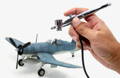
To get started with airbrushing miniatures, you'll need a few essential tools and supplies. One of the most popular airbrush brands in the miniature painting community is Iwata, known for its high-quality and reliable airbrushes. Consider investing in a reliable airbrush model such as the Iwata Eclipse or Iwata Neo for starters.
In addition to the airbrush itself, you'll need an air source, such as a compressor, to provide the necessary airflow. Make sure to choose a compressor that is suitable for your painting needs and offers adjustable pressure settings.
To achieve optimal results, it's important to thin your paints properly. Acrylic paints used for miniature painting can be quite thick out of the bottle, so thinning them with a suitable thinner or flow improver is crucial. This ensures that the paint flows smoothly through the airbrush without clogging or splattering.
Mastering the Technique
Now that you have your airbrush and supplies ready, it's time to master the technique of airbrushing miniatures. While it may seem daunting at first, with practice and patience, you'll soon be able to create stunning results.
Before you start airbrushing, it's essential to prepare your miniatures properly. Clean them thoroughly to remove any dust or debris that may interfere with the paint application. Additionally, prime your miniatures with a suitable primer to provide a smooth surface for the paint to adhere to.
When airbrushing, it's important to maintain the right distance between the airbrush and the miniature. Typically, a distance of 6 to 8 inches works well, but it may vary depending on the desired effect and the type of paint you are using. Experimentation is key to finding the sweet spot.
Real-Life Examples: Painting Warhammer Miniatures
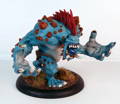
To illustrate the effectiveness of airbrushing miniatures, let's take a look at painting Warhammer miniatures, which are a popular choice among hobbyists and gamers alike. Warhammer miniatures often feature intricate details and complex color schemes, making them perfect candidates for airbrushing.
Using an airbrush, you can easily achieve smooth base coats on a large number of miniatures in a fraction of the time it would take with a brush. By applying thin layers of paint with the airbrush, you can quickly build up the desired colors and gradients, capturing the essence of these fantastical characters and creatures.
Moreover, the airbrush allows for easy highlighting and shading. By adjusting the air pressure and distance, you can create smooth transitions between light and shadow, adding depth and dimension to your miniatures. This technique is particularly effective for painting large surfaces such as capes or armor plates.
