
"Proceed with the countdown. All groups assume attack coordinates."
–Admiral Ackbar
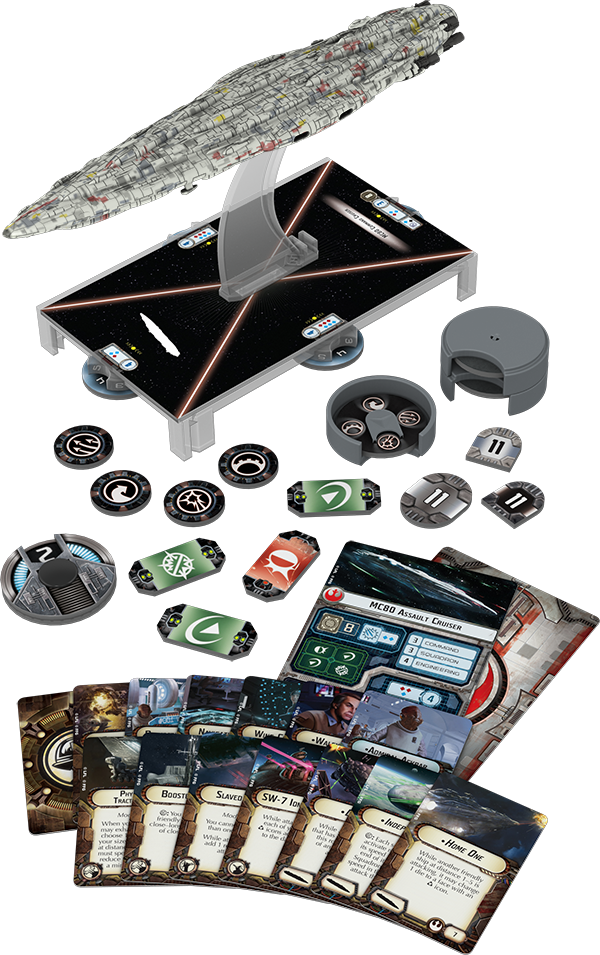
In our first preview of the second wave of expansions for Star Wars™: Armada, we looked at the Imperial-class Star Destroyer Expansion Pack and the many tactics its miniature Imperial-class Star Destroyer and upgrades make available to the Imperial Navy and its fans. Today, we press deeper into Wave II with a look at the Rebellion's first large-base starship, the MC80 Mon Calamari star cruiser from the Home One Expansion Pack.

The miniature MC80 Mon Calamari star cruiser from the Home One Expansion Pack
The MC80 Mon Calamari Star Cruiser
The largest, best shielded, and hardest hitting of all Rebel ships to-date, the MC80 Mon Calamari star cruiser can be added to your fleet as either the MC80 Assault Cruiser or the MC80 Command Cruiser .
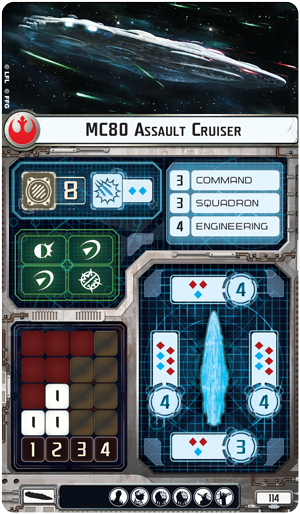

The MC80 star cruiser is the Rebellion's best answer to the Imperial-class Star Destroyer, but they are in no way equivalent. There are numerous differences between them, and the wise admiral will be certain to study them, understand them, and adapt his tactics to account for them.
The first thing you're likely to notice is that whereas the commander of an Imperial-class Star Destroyer wants to engage the enemy head-on to fire from the ship's forward hull zone, the MC80 star cruiser attacks best from its left and right hull zones. This is an important distinction, especially when you consider that the Star Destroyer can equip a weapons team upgrade like the Gunnery Team while the MC80 star cruiser cannot.
For starters, it means that you won't want to approach your enemy head-on. You want to move into position alongside your foe and fire from your broadside, or if you're inclined toward a truly aggressive strategy, you can run your MC80 straight through the middle of your opponent's fleet, firing six attack dice from each side of your ship. If you do this, your MC80 can actually fire as many dice per round as the Imperial-class Star Destroyer, which can fire eight from its front hull zone and four from its left or right hull zone for a total of twelve attack dice. However, if you perform this slashing maneuver, you'll be forced to split your attack dice between two separate targets, and you'll leave your star cruiser exposed to attacks from both sides.

Alternatively, the MC80 can easily be incorporated into a strategy in which you hope to circle your foes and fire at your opponent's side or rear hull zones. If you have the initiative, you can fly two star cruisers in a line so that the first can fire and then fly forward, leaving room for the second to fire and fly forward after your opponent activates a ship. By concentrating your fire in this way, you're likely to make short work of any enemy ship you prioritize.

Having won inititative, the Rebel player is able to activate an MC80 star cruiser before the Imperial player can activate the Victory-class Star Destroyer. The MC80 fires, then moves out of the Star Destroyer's forward firing arc.

Next, the Imperial player activates the Star Destroyer. Forced to split its attacks between the two MC80s and to take its attack against the unactivated MC80 from long range, it fails to land any damage to either ship's hull.

Finally, after the Imperial player is forced to maneuver the Star Destroyer into range of the second MC80s blue dice, the Rebel player launches an attack of six dice against the Star Destroyer, then flies to set up another broadside shot. If the Rebel player activates this second MC80 first in the next round, it can attack with all the dice from its right firing arc before flying away and denying the Imperial player a shot from the Star Destroyer's devastating forward firing arc.
After you explore the differences between their attack dice, you're likely to notice that the MC80 star cruiser costs you several fewer fleet points than the Imperial-class Star Destroyer costs the Empire. The MC80 Command Cruiser weighs in at 106 fleet points, compared to the Imperial I-class Star Destroyer's 110, and at 114 fleet points the MC80 Assault Cruiser costs six less than the Imperial II-class Star Destroyer, which requires 120 of the Empire's 400 available points. Despite this, however, you get the same overall number of hull points and shields, although more of those points are invested in shields than in hull points. This makes the MC80 cruiser slightly more tactical; you need to make good use of your commands and defense tokens to get maximum value from your shields. This fact only adds to the value of Walex Blissex , who allows you to recover one of the defense tokens you've previously spent.
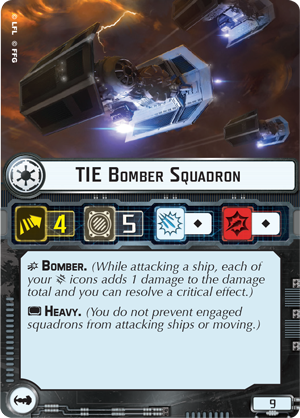
 Additionally, you'll note that the MC80 star cruiser's defensive tactics are built into even its upgrade bar. Both versions of the ship feature at least one defensive retrofit upgrade slot, while the MC80 Assault Cruiser actually features two. This means you can equip the Core Set's Electronic Countermeasures to ensure that you always have at least one of your defense tokens available for use, and with all the shields you have spread across your hull zones, you can get tremendous value from the Advanced Projectors included in the Assault Frigate Mark II Expansion Pack. On top of these options, the Home One Expansion Pack adds another, the Cluster Bombs defensive retrofit, which you can discard to help your squadrons make short work of a TIE Bomber Squadron , or any other squadron that you can't allow to keep blasting at your ship.
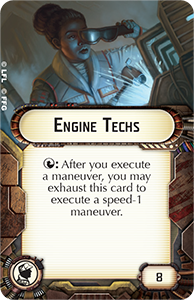
Finally, the MC80 star cruiser is slower than the Imperial-class Star Destroyer. The Star Destroyer has a maximum speed of three, but the MC80 has only a maximum speed of two. However, you can easily turn this disadvantage into a strength by equipping the Engine Techs support team. With a team of Engine Techs aboard your MC80, you can fly just as fast as the Imperial-class Star Destroyer anytime you reveal the navigation command, and you can do so with better maneuverability.

After revealing a Navigate command, the Rebel player maneuvers an MC80 around an asteroid field, but fails to set up a broadside attack against the Star Destroyer.

Accordingly, the Rebel player decides to exhaust the MC80's Engine Techs to execute another speed "1" maneuver. The MC80 guarantees itself a broadside shot against the Victory-class Star Destroyer, or if the Rebel player activates it first in the next round, it can concentrate fire against the Star Destroyer from both its forward and right firing arcs.
More than that, since you don't actually have to lock your speed at "3," you won't have to slow down to go back to speed "2," meaning that you'll be able to stay within close range again on the next round.
Admiral Ackbar and the Home One
"We’ve got to give those fighters more time. Concentrate all fire on that Super Star Destroyer."
–Admiral Ackbar
The Rebel Alliance didn't defeat the Empire with superior military strength. In fact, despite the great strength and resilience of their MC80 star cruisers, the Rebellion was greatly outmatched. Instead, it won the Galactic Civil War because its heroes worked together to accomplish tremendous feats and because they fought according to the designs of some of the galaxy's shrewdest tactical minds, including that of Admiral Gial Ackbar, the Rebellion's chief military commander and the individual responsible for commanding the Rebel fleet during the decisive Battle of Endor.
 Admiral Ackbar arrives to Armada as a commander perfectly suited to the MC80 star cruiser and the Rebellion's other broadside ships, such as the MC30c frigate, which we'll explore in more detail in an upcoming preview. His ability reads:
"Before a friendly ship’s Attack Step, it may choose to attack from only its left and right hull zones this round. If it does, it may add 2 red dice to its attack pool while attacking a ship."
At thirty-eight fleet points, Admiral Ackbar isn't a cheap addition to your fleet, so you'll want to make sure you're going to take frequent advantage of his ability. However, if you can exploit his ability to its fullest, Admiral Ackbar can inspire your fleet to some truly devastating rounds of fire.
With both Admiral Ackbar and Enhanced Armament , an MC80 Assault Cruiser can fire as many as seven red attack dice. That's easily enough to get the better of most exchanges fired at long range. You can even add yet another red attack die if you're attacking from the Defiance against a ship that has already activated.
 With all those red dice, though, and with all their potential damage, you'll want to be certain to negate your opponent's brace command as often as possible to avoid seeing your damage halved. That's where the Home One title comes into play. The personal flagship of Admiral Ackbar, the Home One is one of the most important and iconic of all the Rebel starships presented in the original Star Wars trilogy, and it brings an appropriately powerful ability to your Armada battles:
"While another friendly ship at distance 1–5 is attacking, it may change 1 die to a face with an  icon."
The thing to remember about red dice is that while they have the longest range, they are the game's least accurate dice. Two of their faces are blank, and only one features an accuracy result. Thus, while Admiral Ackbar can increase your ability to concentrate your fire from long range, you're likely going to need to modify your dice in order to get the most out of your results, and the Home One offers one of the best possible modifications to all friendly ships within range.
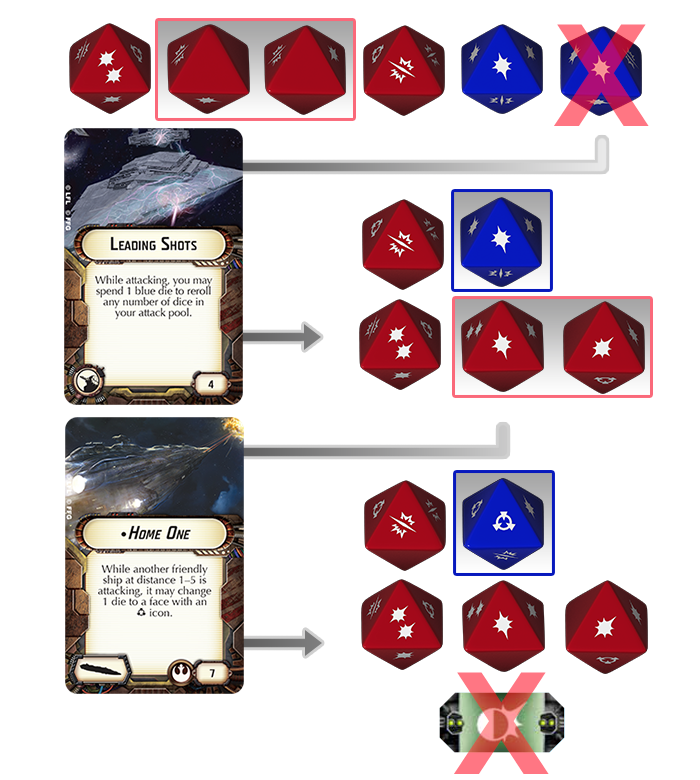
The ability to convert any one die face to an accuracy result can't be overvalued. It can steer your shots to the hull zone you really want to hit, it can prevent your damage from being halved, or it can ensure that your critical hit against an Imperial-class Star Destroyer results in a faceup damage card. The fact that the Home One title can convert your other ship's blank result to this accuracy result only makes it better, especially if you pair it with Leading Shots , so that you can reroll as many dice as you wish before choosing which to convert to an accuracy result.
Outnumbered and outgunned, the Rebel Alliance cannot hope to overpower the Empire. It must, instead, coordinate shrewd, tactical strikes, and there are few individuals better suited to lead such initiatives than Admiral Ackbar. Likewise, there are few better ships to support his command than the Home One, and you'll be able to bring both Ackbar and the Home One to your battles when the Home One Expansion Pack arrives.
Make the Jump to Hyperspace
When Armada Wave II arrives, the game's battles grow even larger, incorporating the first large-base ships for both the Empire and the Rebellion and increasing in scope to 400 fleet points. This means you'll have even more space for exploring unique fleet designs. Will Admiral Ackbar, the Home One, and the Home One Expansion Pack play a part in your favorite Rebel fleet?